
In the first part of this excruciating tutorial, I taught the reader how to begin with MicroPython on an ESP32-based development board. We:
- Flashed the board
- Frolicked in the REPL
- Configured WiFi
- Uploaded scripts
- Build a circuit with a DS18B20 1-Wire temperature sensor
- Used MicroPython to read the temperature
In this part of the tutorial, we’ll take the data we gather with the sensor and publish it over MQTT.
If you’re unfamiliar with the concept, I’ll try to explain MQTT in a nutshell.
MQTT in a Nutshell
MQTT is a machine-to-machine protocol for publishing and subscribing to messages. Importantly, MQTT imposes no constraints upon the content nor structure of those messages.
In a typical setup, you have a single MQTT broker and one-or-many MQTT clients. A client may publish messages, subscribe to messages, or both. A client needn’t be an IoT device, a web app, a desktop or mobile app, a microservice, or anything in particular, as long as it speaks MQTT.
All clients connect to the broker. The broker is responsible for receiving published messages and (possibly) delivering them to interested clients.
Each message has a “topic”. As is vital to the publish/subscribe pattern, a message’s publisher doesn’t necessarily care if anyone is listening. Interested clients will subscribe to this topic.
A MQTT Example
You have an MQTT client—perhaps a device with a temperature sensor—called bob which wants to publish temperature data. It may publish on a topic such as bob/sensor/temperature, and the message would be the data, e.g., 68.75.
Another MQTT client, ray, may want to listen for temperature data so we can display it as a time series graph on a dashboard; ray would tell the broker it wishes to subscribe to the bob/sensor/temperature topic. Finally, when bob publishes on this topic, the broker notifies ray, and ray receives the message. ray can then do whatever it needs with its data.
Wildcards
Subscriptions support wildcards. If client bob had another sensor which reports the relative humidity, it may publish this data under the topic bob/sensor/humidity. Client ray could use a single-level wildcard such as bob/sensor/+, which would receive messages published on bob/sensor/humidity and bob/sensor/temperature. Or perhaps a multi-level wildcard such as bob/#, which would subscribe to any topic beginning with bob/.
A “topic per client” is merely a convention for sake of our example. MQTT enforces no such constraint.
There’s certainly more to it than just the above—but that’s the nutshell, and I’m calling it good.
Photo by Caleb Martin / Unsplash

Why MQTT?
It’s just as important to understand why you’d want to use a technology over another (or none at all).
MQTT's designers had resource-constrained devices (such as sensors) in mind; it’s a “thin” protocol, and easier to implement compared to, say, HTTP. As such, you’ll find that MQTT is a core technology behind many cloud-based “IoT platforms”, including the offerings of IBM, Amazon, Microsoft, Adafruit, and many others.
You can directly access many of these services via RESTful APIs, but it will necessarily consume more of your devices’ resources to do so.
Using HTTP(S) instead of MQTT makes sense if you need to make a remote procedure call, or if a request/response model is more natural than MQTT's publish/subscribe model in your problem domain. Even then, protocols such as CoAP will demand fewer resources.
Now that we understand what MQTT is all (or more accurately, “partly”) about, let’s use it to spread the word about our ambient temperatures.
Boot Script and Temperature Module
We’ll use the code from the last tutorial to begin with. For reference, I’ll show them below.
You should have two (2) files, the first being our startup script, boot.py:
def connect():
    import network
    sta_if = network.WLAN(network.STA_IF)
    if not sta_if.isconnected():
        print('connecting to network...')
        sta_if.active(True)
        sta_if.connect('<YOUR SSID>', '<YOUR PASSWORD>')
        while not sta_if.isconnected():
            pass
    print('network config:', sta_if.ifconfig())

def no_debug():
    import esp
    # you can run this from the REPL as well
    esp.osdebug(None)

no_debug()
connect()
And the second is temperature.py, an abstraction around the temperature sensor:
import time
from machine import Pin
from onewire import OneWire
from ds18x20 import DS18X20


class TemperatureSensor:
    """
    Represents a Temperature sensor
    """
    def __init__(self, pin):
        """
        Finds address of single DS18B20 on bus specified by `pin`
        :param pin: 1-Wire bus pin
        :type pin: int
        """
        self.ds = DS18X20(OneWire(Pin(pin)))
        addrs = self.ds.scan()
        if not addrs:
            raise Exception('no DS18B20 found at bus on pin %d' % pin)
        # save what should be the only address found
        self.addr = addrs.pop()

    def read_temp(self, fahrenheit=True):
        """
        Reads temperature from a single DS18X20
        :param fahrenheit: Whether or not to return value in Fahrenheit
        :type fahrenheit: bool
        :return: Temperature
        :rtype: float
        """

        self.ds.convert_temp()
        time.sleep_ms(750)
        temp = self.ds.read_temp(self.addr)
        if fahrenheit:
            return self.c_to_f(temp)
        return temp

    @staticmethod
    def c_to_f(c):
        """
        Converts Celsius to Fahrenheit
        :param c: Temperature in Celsius
        :type c: float
        :return: Temperature in Fahrenheit
        :rtype: float
        """
        return (c * 1.8) + 32
Upload both of these files via ampy:
$ ampy --port /dev/tty.SLAB_USBtoUART put boot.py && \
  ampy --port /dev/tty.SLAB_USBtoUART put temperature.py
(Replace /dev/tty.SLAB_USBtoUART with your device path or COM port.)
In the first part of this tutorial, I told you to download (or clone) the micropython-lib project. This is not necessary! Read on.
Install the MQTT Modules via upip
Since your device should be online, we can use upip from the REPL. upip is a stripped-down package manager for MicroPython. It's built-in to the ESP32 port of MicroPython; you already have it. It downloads packages from PyPi, just like pip.
Open your REPL, and execute:
import upip
upip.install('micropython-umqtt.robust')
Sample output:
Installing to: /lib/
Warning: pypi.python.org SSL certificate is not validated
Installing micropython-umqtt.robust 1.0 from https://pypi.python.org/packages/31/02/7268a19a5054cff8ff4cbbb126f00f098848dbe8f402caf083295a3a6a11/micropython-umqtt.robust-1.0.tar.gz
Take note: if your device isn’t online,
upipwon’t work from the device’s REPL.
You also need to grab its dependency, micropython-umqtt.simple:
upip.install('micropython-umqtt.robust')
Sample output:
Installing to: /lib/
Installing micropython-umqtt.simple 1.3.4 from https://pypi.python.org/packages/bd/cf/697e3418b2f44222b3e848078b1e33ee76aedca9b6c2430ca1b1aec1ce1d/micropython-umqtt.simple-1.3.4.tar.gz
umqtt.simpleis a barebones MQTT client.umqtt.robustdepends onumqtt.simple; it’s an MQTT client which will automatically reconnect to the broker if a disconnection occurs.
To verify that this installed properly, you can execute from your REPL:
from umqtt.robust import MQTTClient
No errors? You’re good.
Get a MQTT Client App
Before we begin the next section, you might want another application handy—a standalone MQTT client. You could try:
- MQTT.fx (GUI; Windows/Mac)
- MQTTBox (GUI; Windows/Mac/Linux)
mosquitto-clientsfrom Mosquitto is available via package manager (CLI; Linux/Mac)- Various free clients on app stores (iOS/Android)
- Node-RED can also connect to an MQTT broker (Web; Windows/Mac/Linux)
Using one isn’t strictly necessary, but will aid experimentation.
Experimenting with umqtt in the REPL
If you’ve been reading closely, you’ll understand that we need an MQTT broker (“server”); a MQTT client with no broker is useless.
It just so happens that public MQTT brokers exist; test.mosquitto.org by the Mosquitto project is one such broker. As a member of the public, you can use it! Just be aware: any data or information you publish on a public MQTT broker is also public. Don’t publish anything you wouldn’t want everyone to know about.
We’ll use this public broker for the purposes of the tutorial, but if you have a different one you wish to use, you go ahead and do that.
Now, let’s try to use our MQTT lib to publish a message on the broker.
Create a Unique “Client ID”
One caveat to note about MQTT: each MQTT client connected to a broker must have a unique identifier: a client ID. You’ll need to pick a phrase or generate something. I’ll just generate one on the command line:
$ python3 -c 'from uuid import uuid4; print(uuid4())'
52dc166c-2de7-43c1-88ff-f80211c7a8f6
Copy the resulting value to your clipboard; you’ll need it in a minute.
Connect to the REPL
Open up a serial connection to your ESP32. I’m going to use miniterm here, which Python 3 bundles:
$ python3 -m serial.tools.miniterm --raw /dev/tty.SLAB_USBtoUART 115200
The --raw flag avoids problems with special characters such as BS and DEL.
Connect to the Broker
As in the first tutorial, I’ll omit the prompt (
>>>) when working with the REPL.
We should now be able to import MQTTClient:
from umqtt.simple import MQTTClient
The MQTTClient constructor accepts a client ID and a DNS or IP address of a MQTT broker. We’ll use our pseudorandom client ID from above, and test.mosquitto.org for the server, then call connect():
client = MQTTClient('52dc166c-2de7-43c1-88ff-f80211c7a8f6',
		'test.mosquitto.org')
client.connect()
The output of this command, if all went well, should be 0; connect() will raise an exception it the connection failed.
Connect a Second Client
At this point, I’m going to fire up MQTT.fx; I’ll use it to subscribe to the messages which the ESP32 publishes.
I enter server test.mosquitto.org in the server input field, and leave the port field 1883, which is the default (insecure) MQTT port. I then click “Connect,” and wait for negotiation. Here’s a screenshot of my connected client:
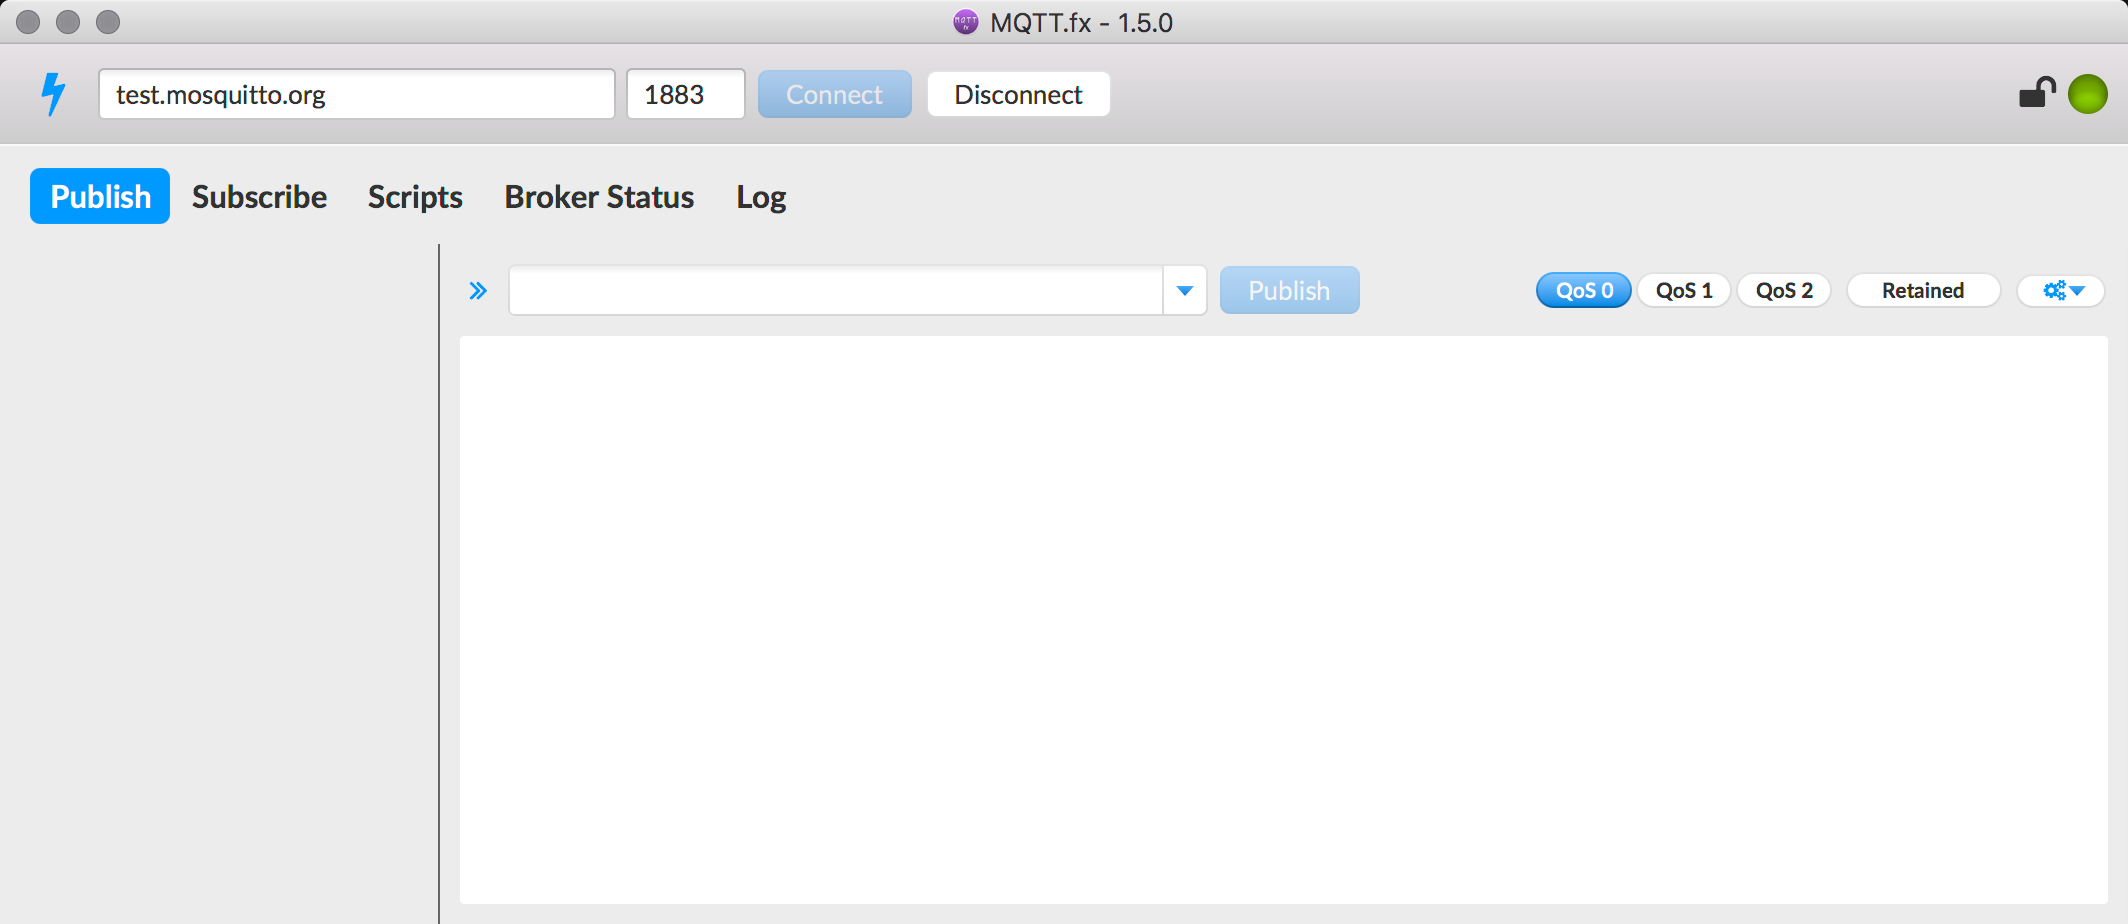 MQTT.fx connected to
 test.mosquitto.org.
I’ll come back to MQTT.fx after we learn to publish from the REPL.
Publish an MQTT Message
Assuming the ESP32 is now connected to the broker, you can publish messages. First, I’ll emit a temperature in Fahrenheit, with the topic boneskull/test/temperature/fahrenheit:
client.publish('boneskull/test/temperature/fahrenheit', 72)
…but MicroPython complained:
Traceback (most recent call last):
  File "<stdin>", line 1, in <module>
  File "umqtt/simple.py", line 112, in publish
TypeError: object of type 'int' has no len()
What’s the problem here? Let me explain:
- An MQTT message payload could be literally any data. MQTT has no notion of “data types”. It doesn’t know what a “number” or “integer” is. Your payload will always consist of raw bytes.
- There’s no direct mapping of an integer to “bytes,” as there isn’t just one way to encode this number as binary data. We don’t know if this is a signed or unsigned integer, how many bits we should use, etc.
- The problem could have been obvious (and we could have RTFM), but MicroPython shies away from overly “friendly” APIs due to resource constraints, so it’s not obvious what’s happening here.
The easiest solution? Publish a str instead:
client.publish('boneskull/test/temperature/fahrenheit', '72')
If this worked, there should be no output from the statement.
Hooray? I’m not convinced—are you? This just squirted the temperature into the ether! We should see where these messages are going. I can do that in my MQTT.fx client by subscribing to the topic. This is how:
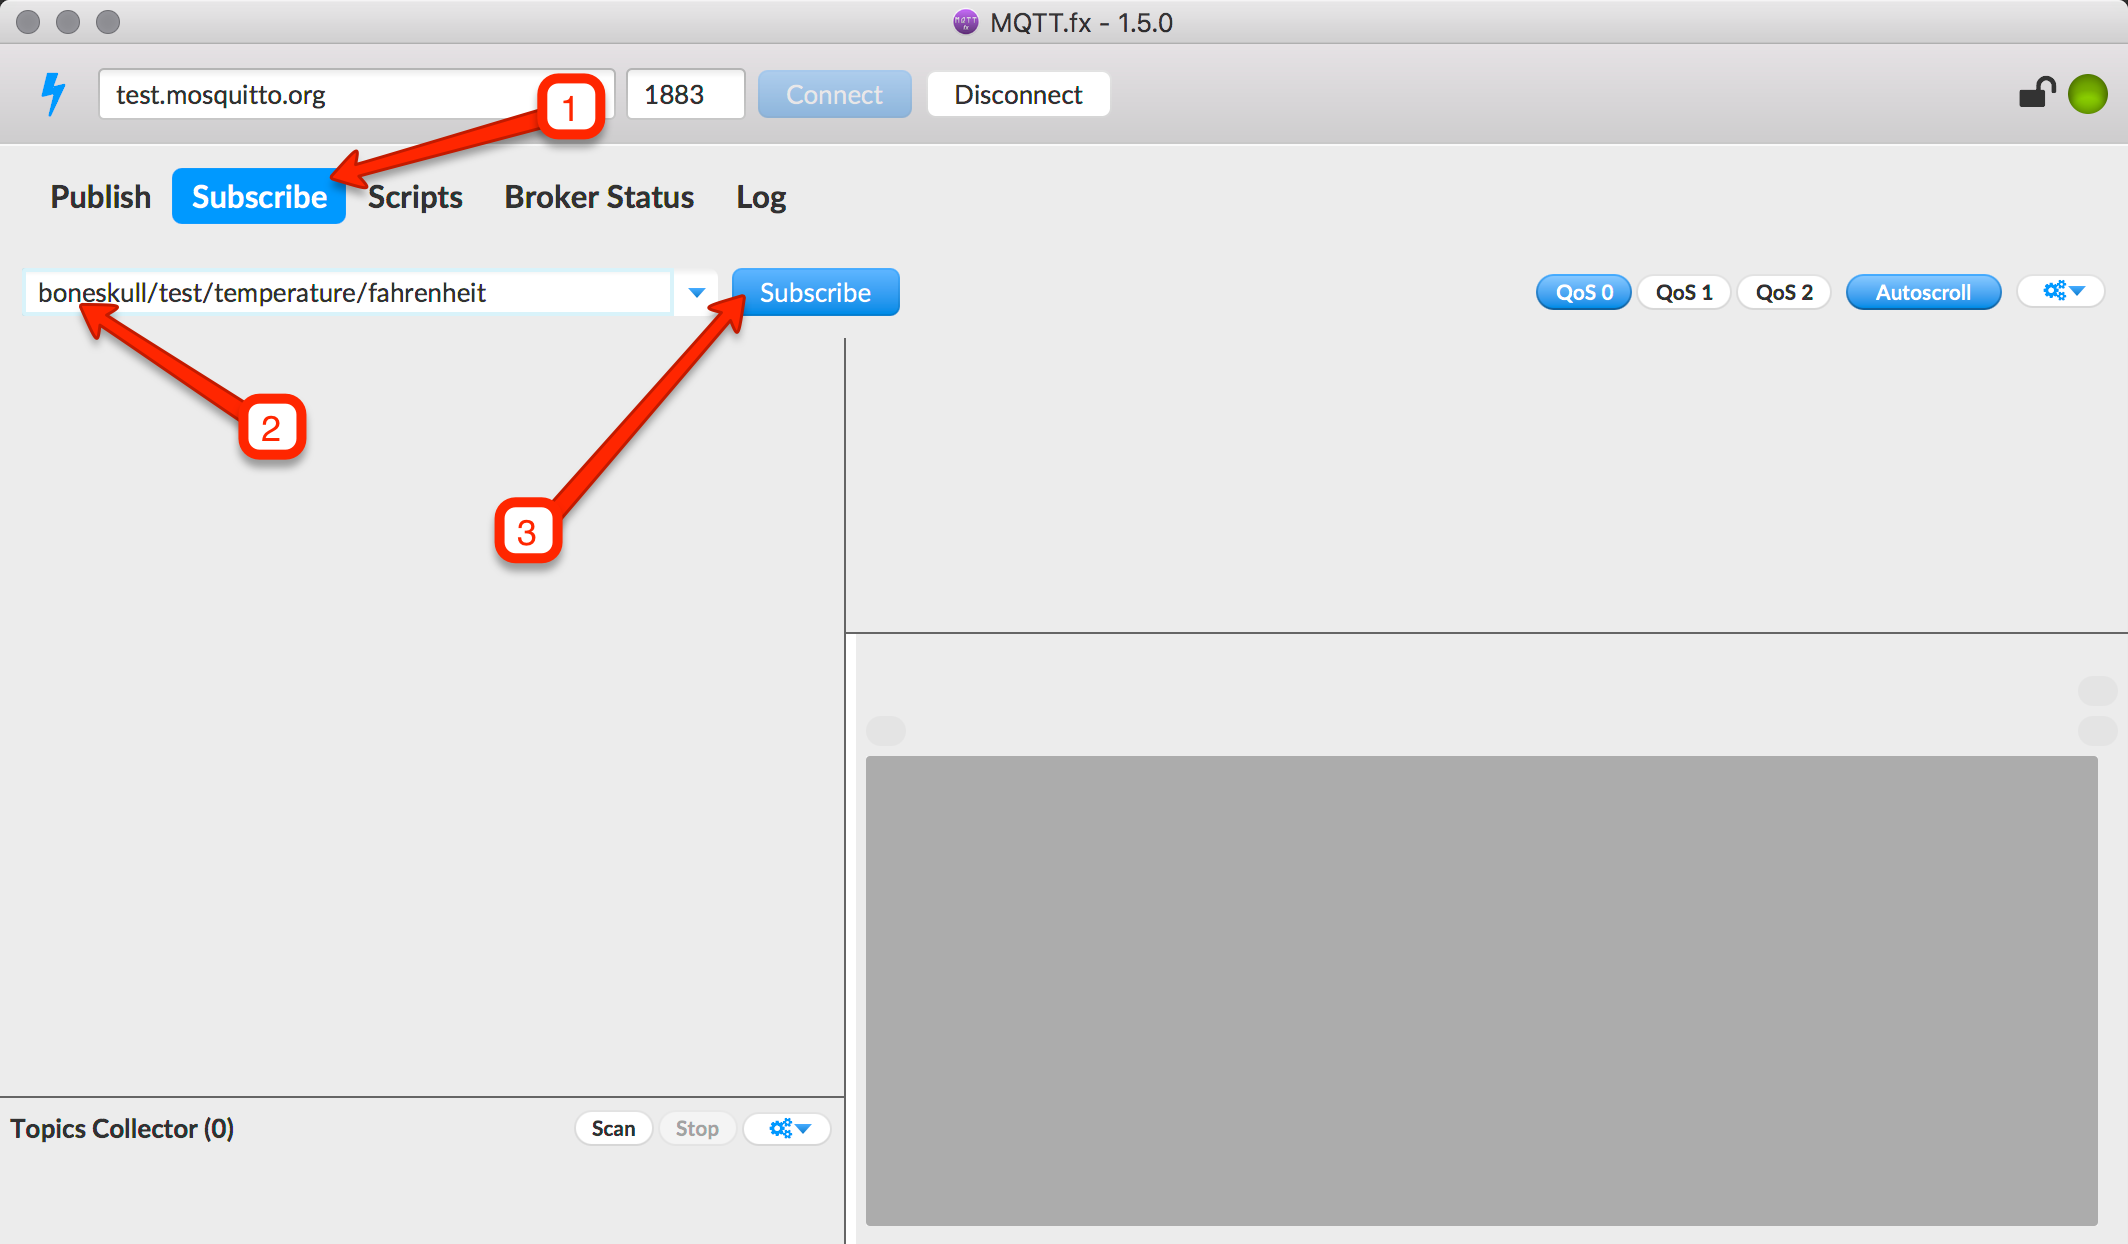 Subscribing to a topic in MQTT.fx
- Click on the “Subscribe” tab
- Enter
boneskull/test/temperature/fahrenheitin the input field - Click “Subscribe” button to the right of input field
After you’ve done this, MQTT.fx will contact the broker, and if successful, you will see the subscription appear beneath the input field:
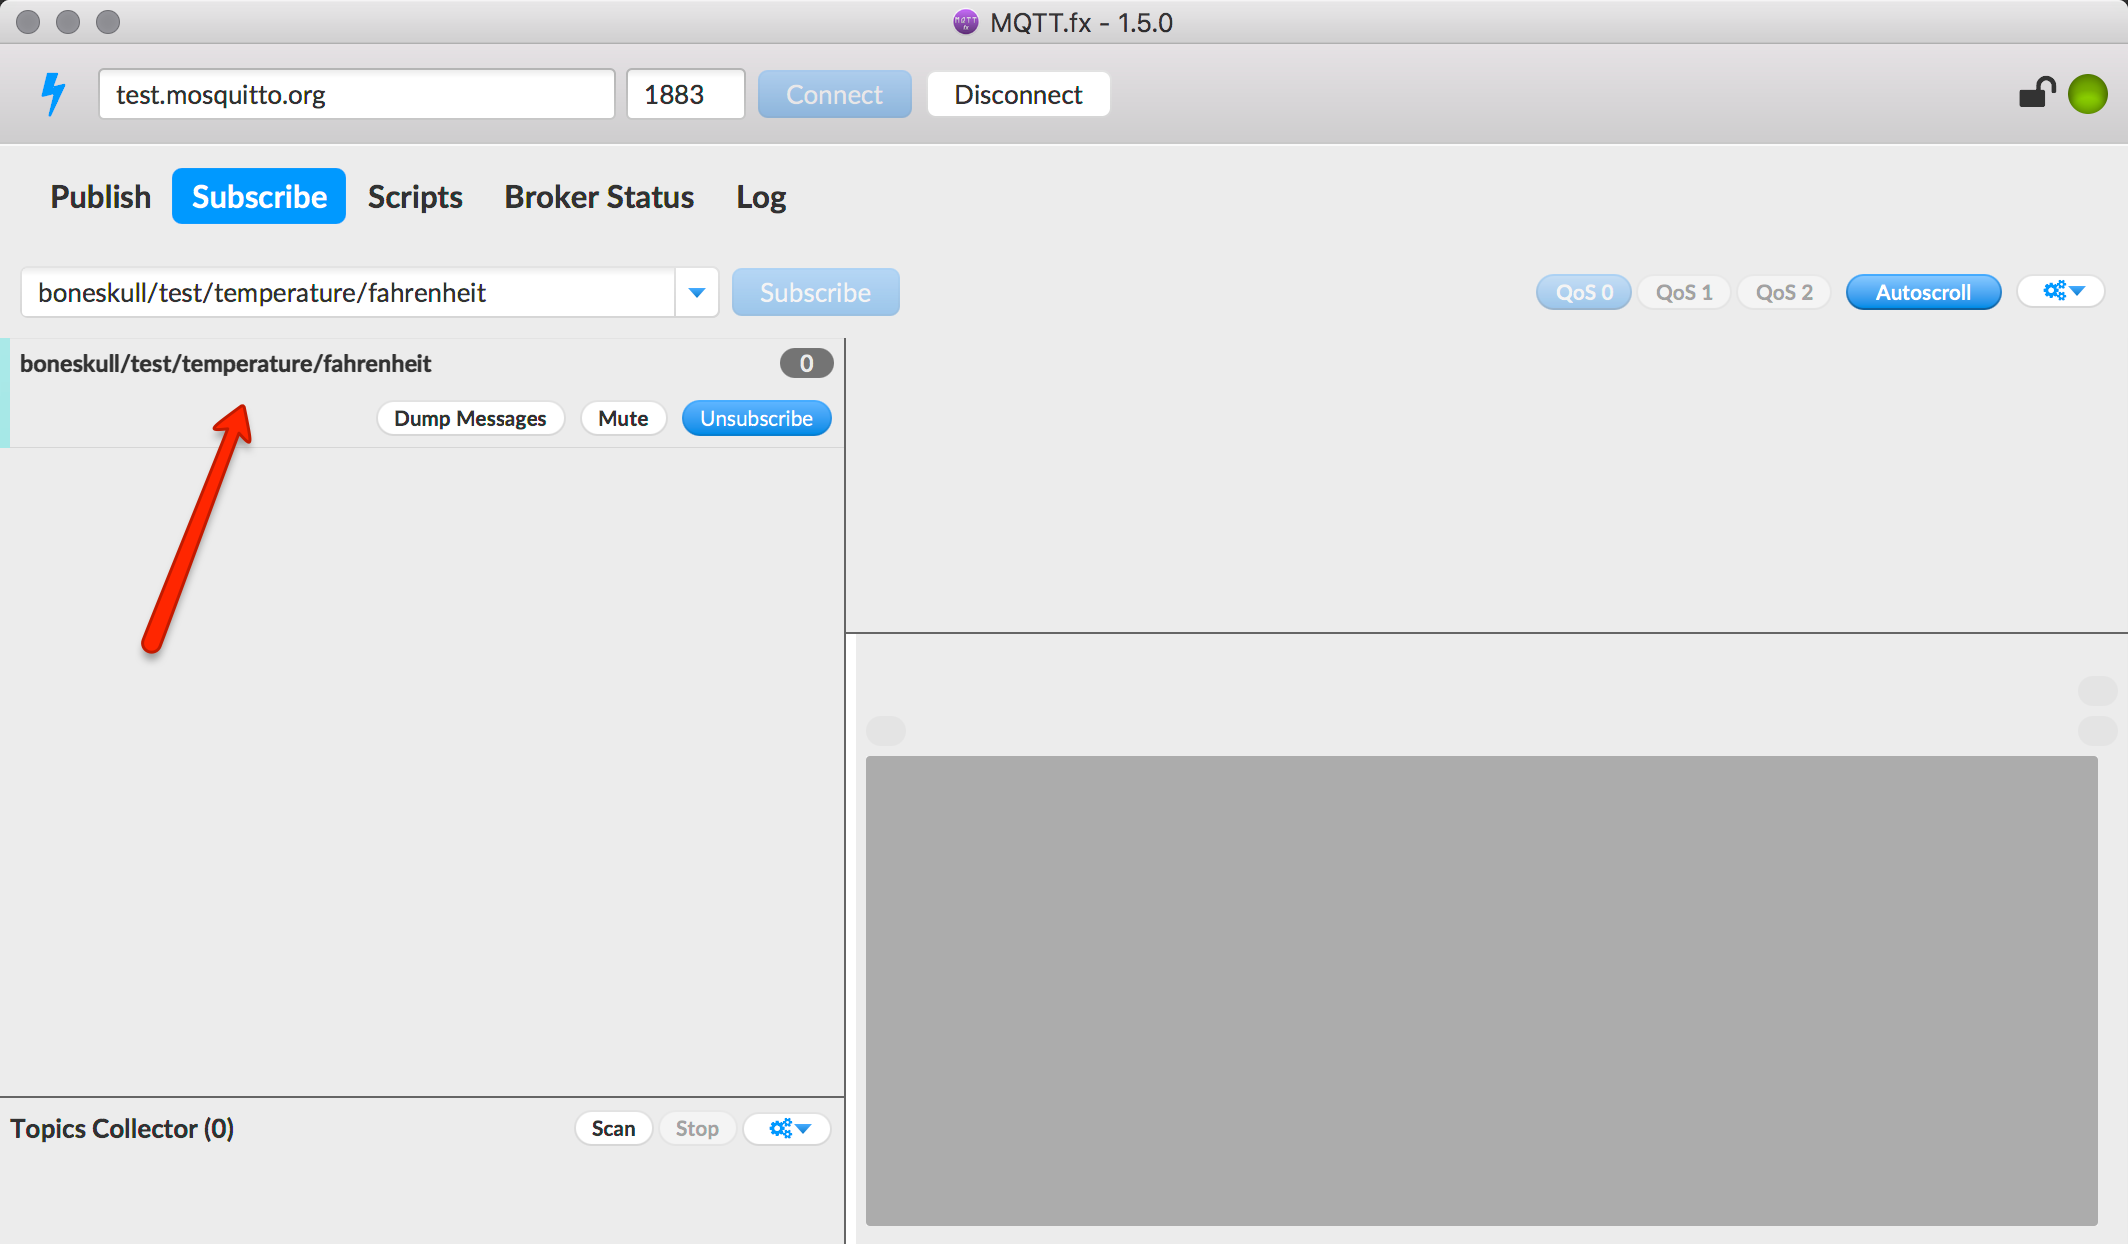 An active subscription in MQTT.fx
Next time we (or any client attached to the broker) publishes on this topic, we will see it in the lower-right area of this window, where it is grey and empty.
Return to your serial terminal, and run the last command again (you can just hit “up-arrow” then “enter”):
client.publish('boneskull/test/temperature/fahrenheit', '72')
Switch back to MQTT.fx. It may take a few seconds depending on how busy the broker is, but the message should now appear to the right, along with its payload:
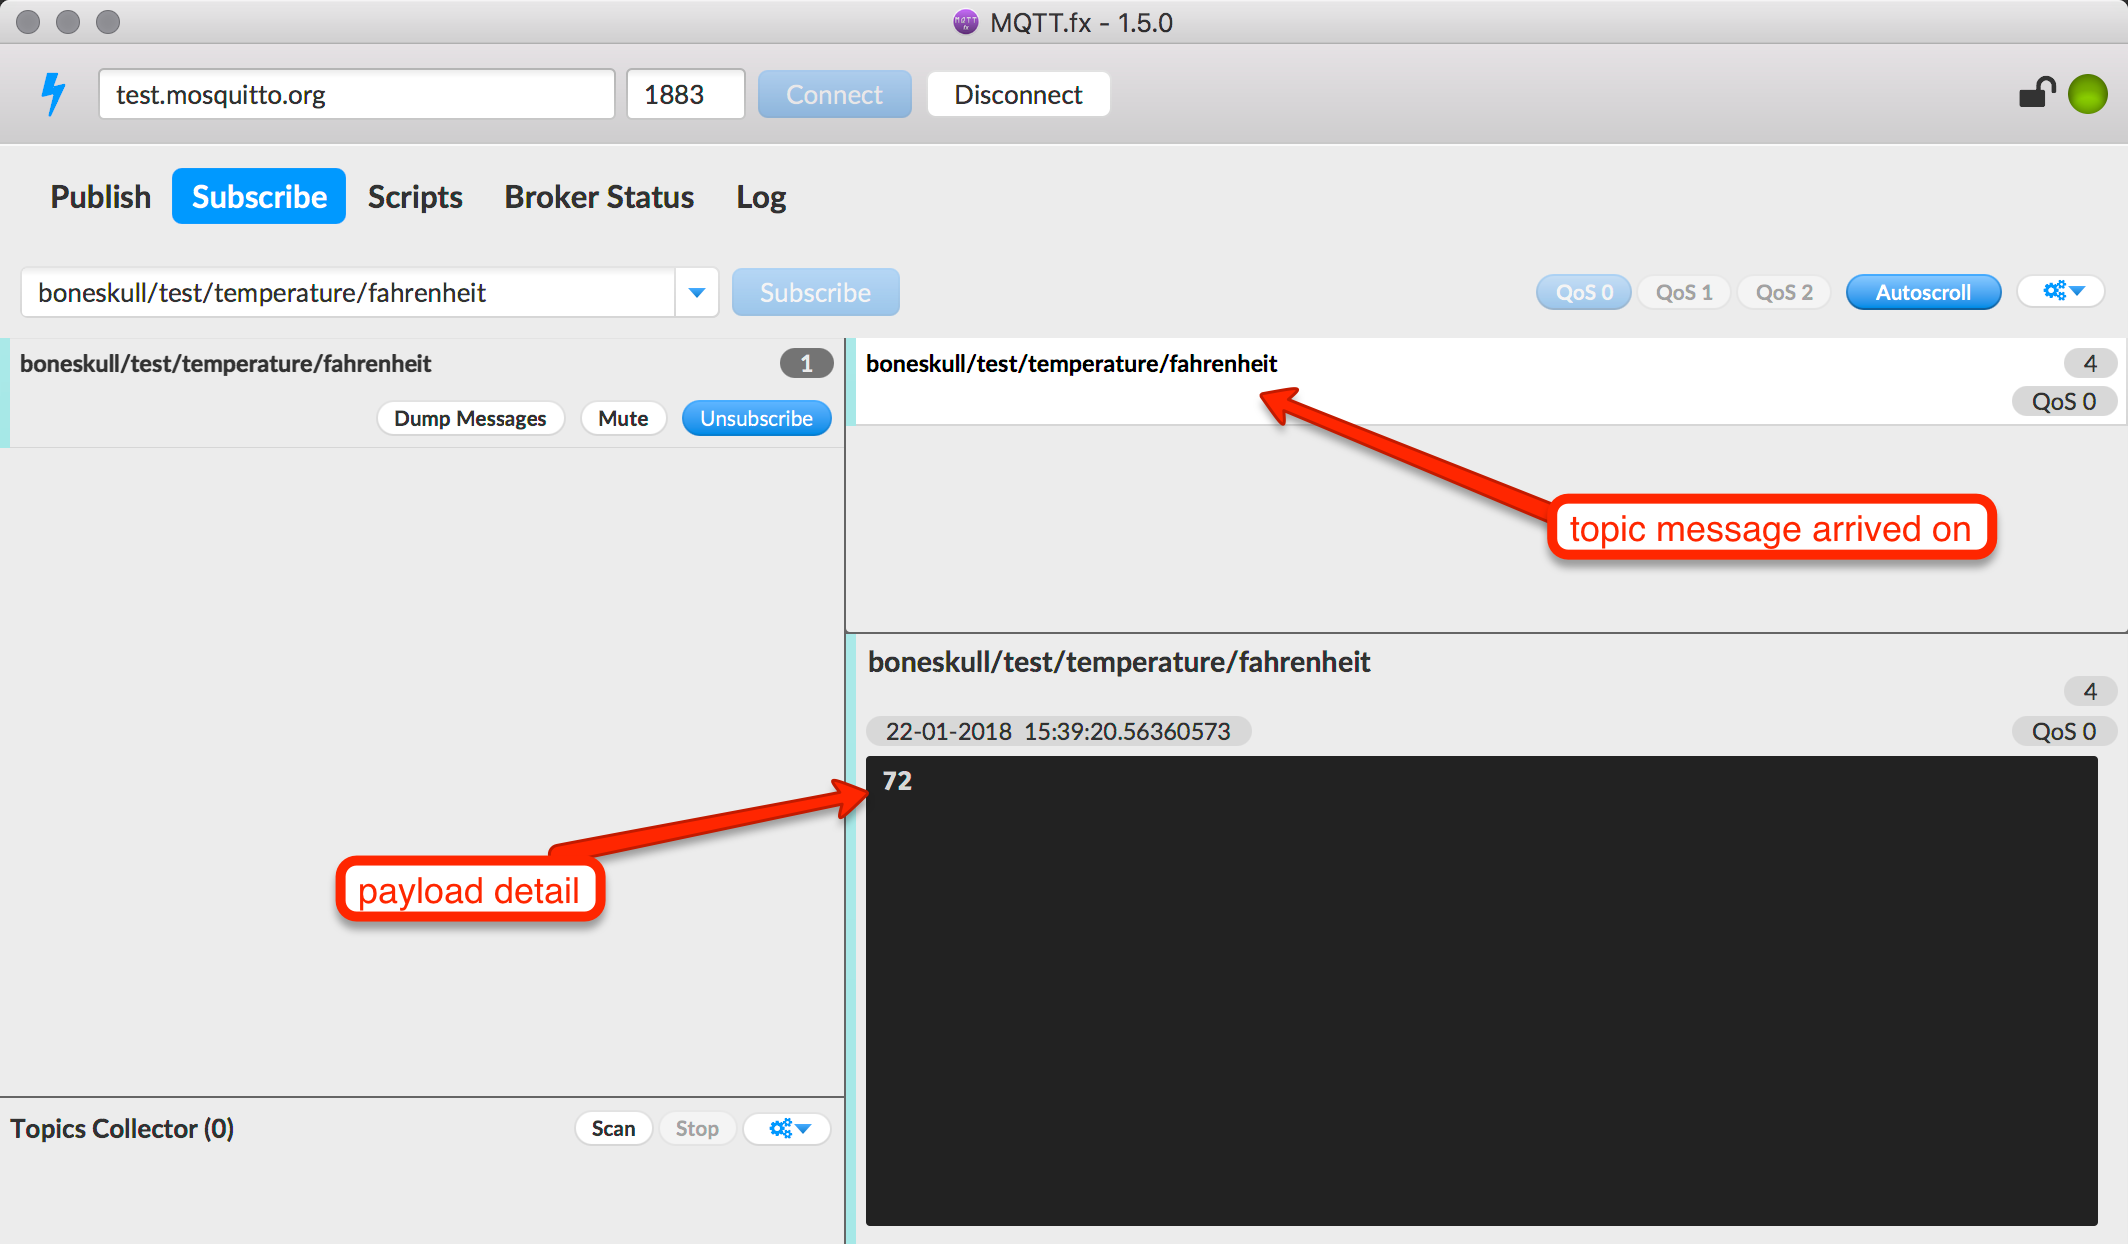 A received message in MQTT.fx
Excellent work!
Now we can use everything we’ve learned, and periodically publish real temperature data. Let’s cook up a little module to do that.
A Module to Publish Temperature
I’ve written up a little module which uses MQTTClient and TemperatureSensor (from our first tutorial) to publish temperature data. Create temperature_client.py:
import time

from umqtt.robust import MQTTClient

from temperature import TemperatureSensor


class TemperatureClient:
    """
    Represents an MQTT client which publishes temperature data on an interval
    """

    def __init__(self, client_id, server, pin, fahrenheit=True, topic=None,
                 **kwargs):
        """
        Instantiates a TemperatureSensor and MQTTClient; connects to the
        MQTT broker.
        Arguments `server` and `client_id` are required.

        :param client_id: Unique MQTT client ID
        :type client_id: str
        :param server: MQTT broker domain name / IP
        :type server: str
        :param pin: 1-Wire bus pin
        :type pin: int
        :param fahrenheit: Whether or not to publish temperature in Fahrenheit
        :type fahrenheit: bool
        :param topic: Topic to publish temperature on
        :type topic: str
        :param kwargs: Arguments for MQTTClient constructor
        """
        self.sensor = TemperatureSensor(pin)
        self.client = MQTTClient(client_id, server, **kwargs)
        if not topic:
            self.topic = 'devices/%s/temperature/degrees' % \
                         self.client.client_id
        else:
            self.topic = topic
        self.fahrenheit = bool(fahrenheit)

        self.client.connect()

    def publishTemperature(self):
        """
        Reads the current temperature and publishes it on the configured topic.
        """
        t = self.sensor.read_temp(self.fahrenheit)
        self.client.publish(self.topic, str(t))

    def start(self, interval=60):
        """
        Begins to publish temperature data on an interval (in seconds).
        This function will not exit! Consider using deep sleep instead.
        :param interval: How often to publish temperature data (60s default)
        :type interval: int
        """
        while True:
            self.publishTemperature()
            time.sleep(interval)
Upload this to your board:
$ ampy --port /dev/tty.SLAB_USBtoUART put temperature_client.py
Your standalone MQTT client app should still be online. Let’s send a message in the REPL, then view the result in the standalone client (please create your own client ID below):
from temperature_client import TemperatureClient
tc = TemperatureClient('boneskull-test-1516667340',
                       'test.mosquitto.org', 12,
                       topic='boneskull/test/temperature')
tc.start(10) # publish temperature every 10s
A word of warning: once you execute the above, the REPL will “hang,” since the start() method is just busy-waiting.
Even though this is a busy-wait,
time.sleep()does not mean that "nothing happens"; the tick rate in the underlying operating system is 10ms; any sleep time (necessarily usingtime.sleep_ms()ortime.sleep_us()) equal to or less than 10ms will preempt other tasks!
Tab back to MQTT.fx:
 Real temperature data in MQTT.fx!
This will loop indefinitely, so when ready, push the “reset” button on your dev board to get back to the REPL (you don’t need to quit your serial terminal beforehand).
Important to note: the “time and date” you see in the payload detail does not mean “when the originating client sent the message.” Rather, it means “when the receiving client received the message.” MQTT messages do not contain a “sent on” timestamp unless you add one yourself!
(To do this, you'd need to ask an NTP server or an external RTC module, which is beyond our scope.)
We’re successfully published a number! That is great news, except, that number could refer to anything. It’d be helpful to include the unit—either Fahrenheit or Celsius—in the payload. I’ll show you how.
Working with JSON
As I’ve beaten to death, MQTT payloads contain anything. That means if you want to send some structured data, you are responsible for serialization and deserialization.
JSON is a common data interchange format for which MicroPython contains built-in support (unlike, say, that vile Arduino API). It’s trivial to “stringify” a dict and publish the result.
To work with JSON—just like in Real Python—we will need to import another module in temperature_client.py:
import json
Then, add the data to the payload within the publishTemperature method:
    def publishTemperature(self):
        """
        Reads the current temperature and publishes a JSON payload on the
        configured topic, e.g., `{"unit": "F", "degrees": 72.5}`
        """
        t = self.sensor.read_temp(self.fahrenheit)
        payload = dict(degrees=t)
        if self.fahrenheit:
            payload['unit'] = 'F'
        else:
            payload['unit'] = 'C'
        self.client.publish(self.topic, json.dumps(payload))
Notice that we didn’t need to coerce the temperature (“degrees”) into a str for purposes of publishing, because JSON is a str itself—the recipient of this payload will decode the JSON into a numeric value.
Disconnect from the REPL (that’s Ctrl-] if you happen to be using miniterm), and upload temperate_client.py to the ESP32 again, then reconnect to the REPL. We don’t need to begin an infinite loop to test it, since we can just call publishTemperature() directly:
from temperature_client import TemperatureClient
tc = TemperatureClient('boneskull-test-1516667340',
                       'test.mosquitto.org', 12,
                       topic='boneskull/test/temperature')
tc.publishTemperature()
The above will send a single message. On the receiving end:
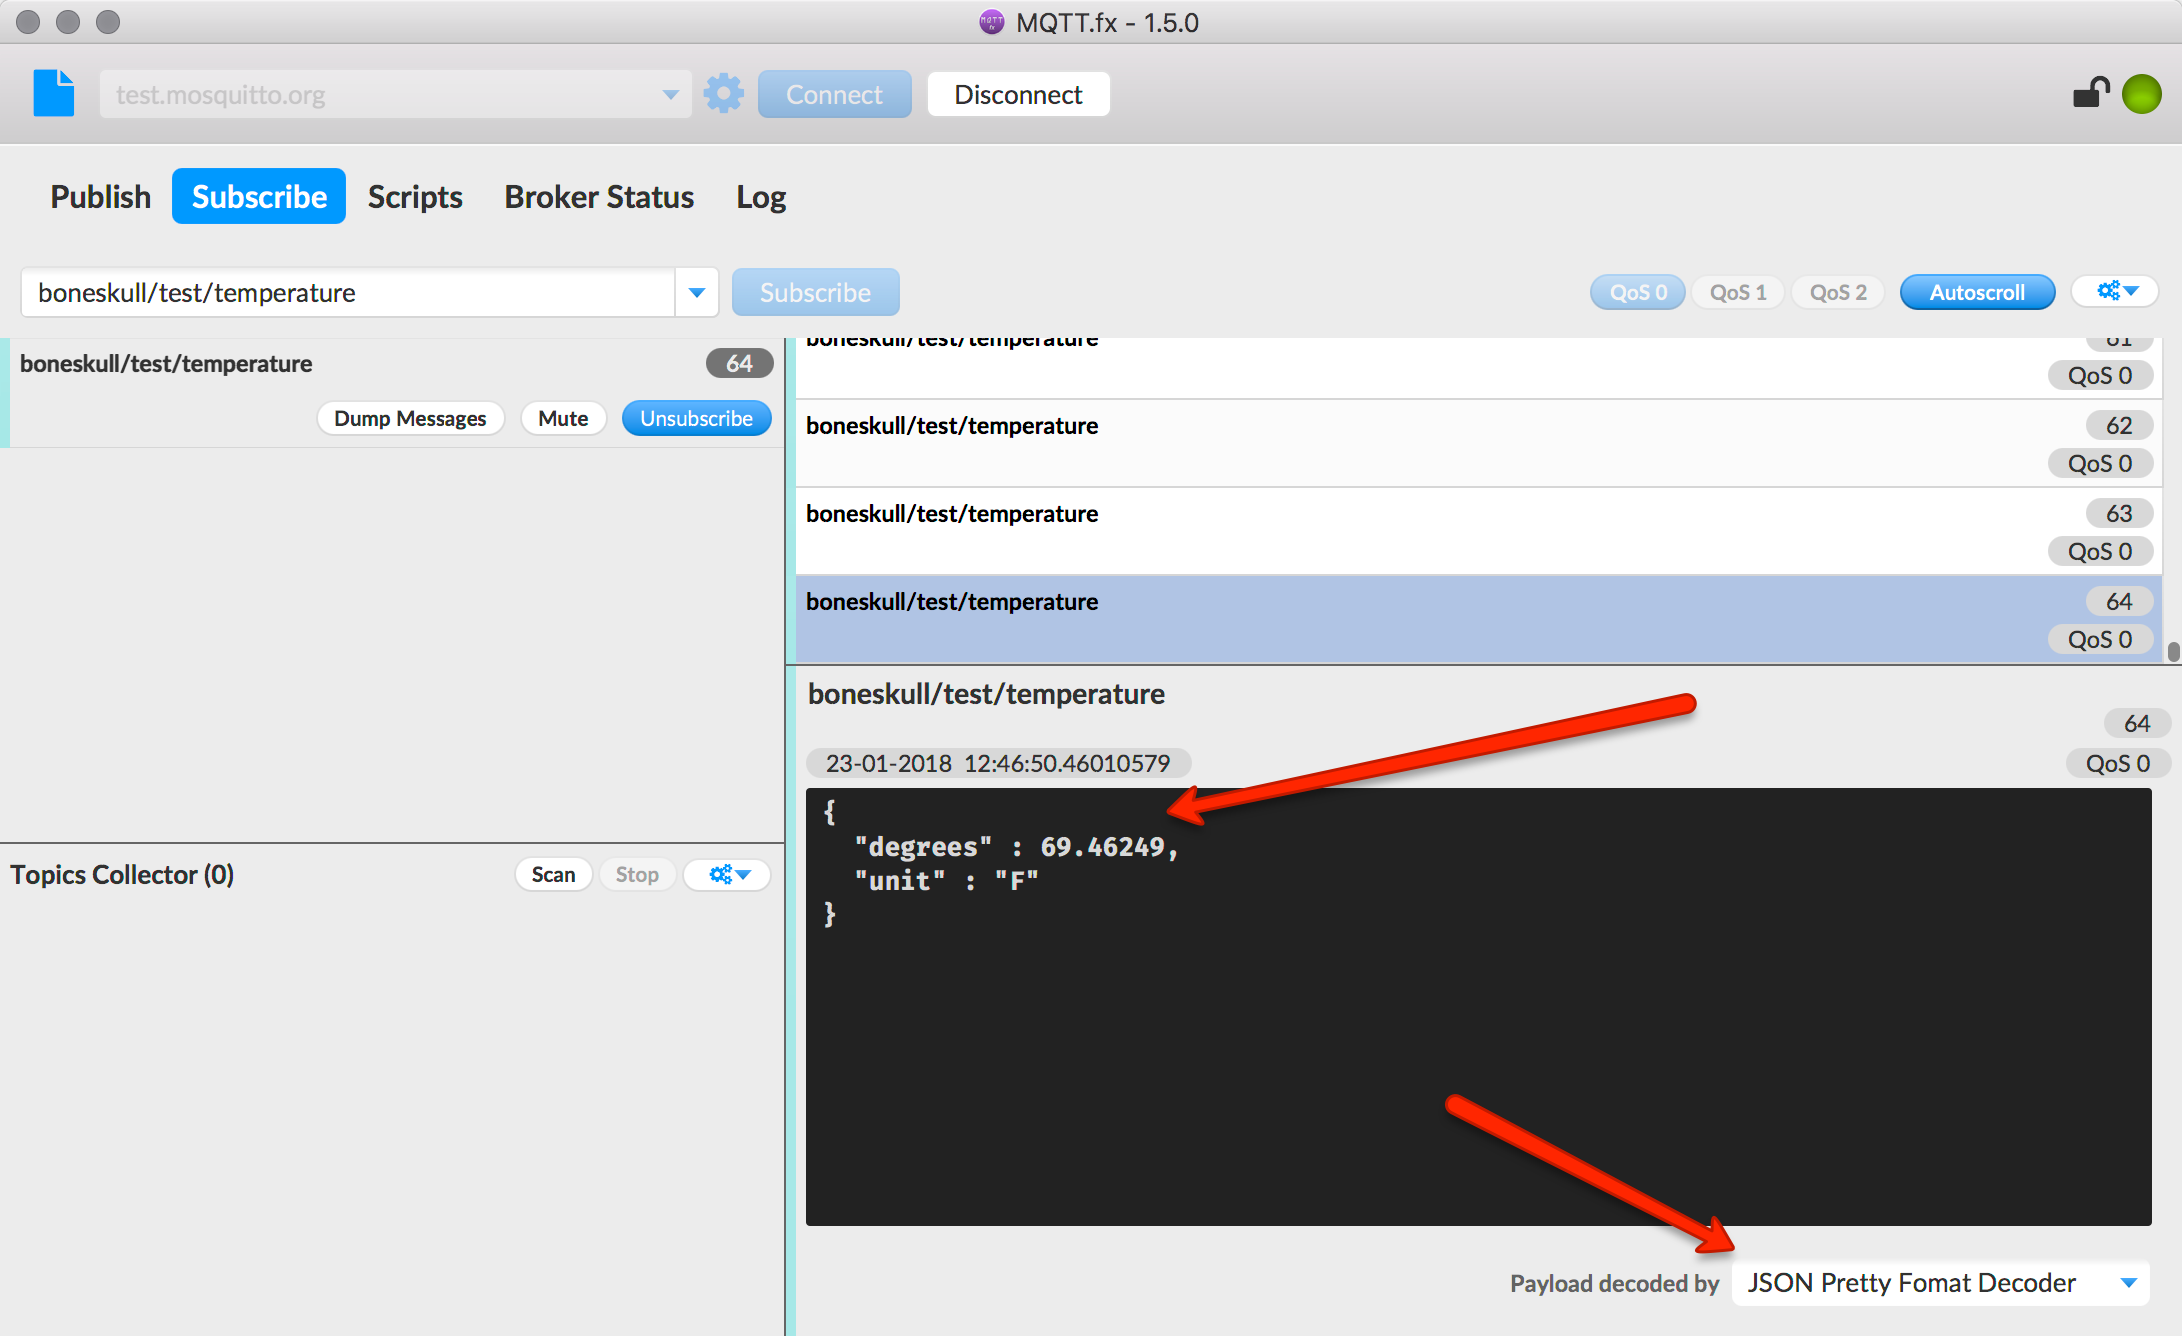 Pretty-printed JSON in MQTT.fx
If you resize your MQTT.fx window to be tall enough, you’ll see the “Payload decoded by” dropdown in the lower-right. You can see the pretty-printed payload appears as we ‘spected.
MQTT.fx also includes Base64 and hex decoders, but the default is “plain text”.
I think you have the basics down. But maybe you aren’t going to run your own private MQTT broker. Let’s take this one step further and interface with an IoT platform.
Use an ESP32 with MicroPython on IBM Cloud
Watson IoT Platform is a service in IBM Cloud (formerly Bluemix). I’ve written a MicroPython module to interface with it, and we’ll use that to save some time.
Watson IoT Platform Quickstart
You can experiment with this platform without needing to sign up for an account.
- Visit the Quickstart page:
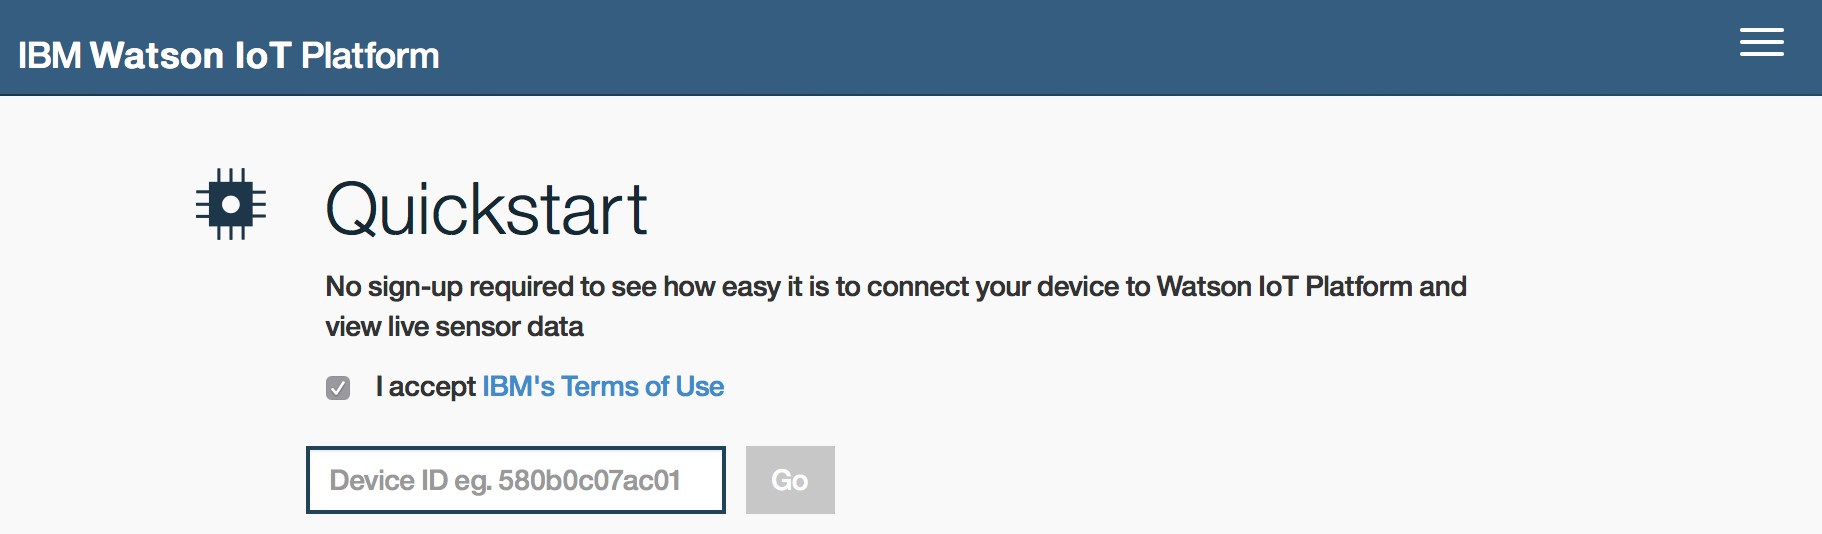 Watson IoT Platform's Quickstart Page
 - Tick “I Accept” after carefully reading the entire terms of use.
- Enter a unique device identifier in the input box. I’m calling mine “boneskull-esp32-test”. Click “Go”.
Keep this browser window open; you’re now ready to send data, and see the result in real-time. Let’s get to it.
Upload the micropython-watson-iot module
micropython-watson-iot is the module I referenced earlier. Its README contains installation instructions using upip, but essentially it’s the same as before, via the REPL:
import upip
upip.install('micropython-watson-iot')
To verify installation, run:
from watson_iot import Device
Assuming that didn’t throw an exception, we can use it like so:
d = Device(device_id='boneskull-esp32-test')
d.connect()
d.publishEvent('temperature', {'degrees': 68.5, 'unit': 'F'})
You should see it reflected in your browser. In fact, if you do something like this…
import time
d.publishEvent('temperature', {'degrees': 68.5, 'unit': 'F'})
time.sleep(5)
d.publishEvent('temperature', {'degrees': 69.5, 'unit': 'F'})
time.sleep(5)
d.publishEvent('temperature', {'degrees': 67.5, 'unit': 'F'})
time.sleep(5)
d.publishEvent('temperature', {'degrees': 66.5, 'unit': 'F'})
…you should see a nifty line graph:
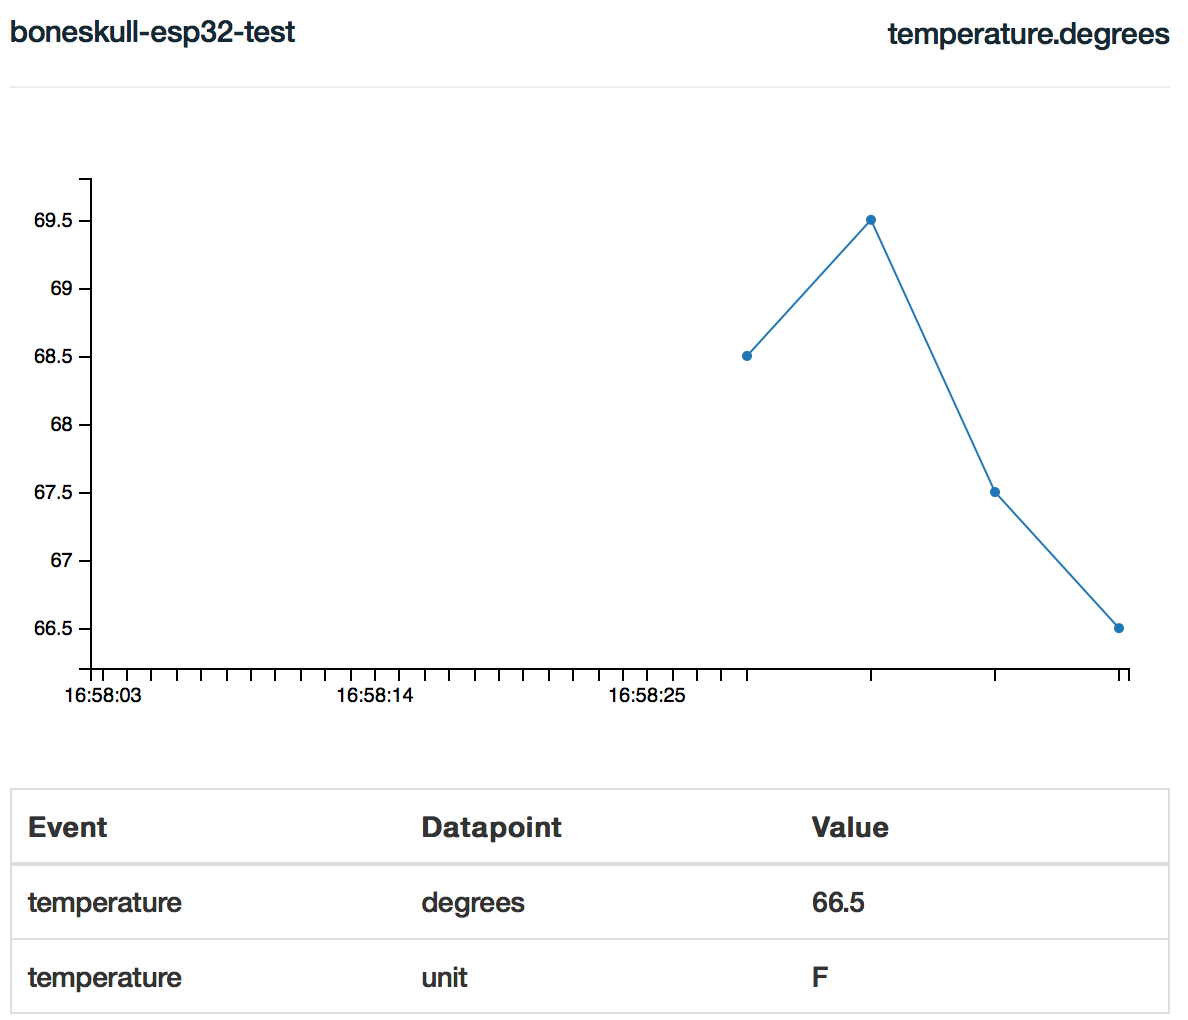 Real-time graph of our temperature data
You’re welcome to play with this in more depth; Watson IoT Platform has a free tier. To sign up, you need to:
- Register with IBM Cloud (no credit card needed)
- Create a Watson IoT Platform service instance using the “free plan” from the catalog
- Click “Launch” to explore the platform.
- Also, check out the docs.
The micropython-watson-iot library offers a few “quality of life” benefits—as IoT platforms typically do—when compared to a vanilla MQTT client and/or broker:
- Messages contain metadata such as “published on” time, handled by the cloud platform
- You can group devices via logical “device types”
- Structured data can be automatically encoded/decoded to/from JSON (it does this by default)
- Create your own custom encoders and decoders (e.g., numeric, Base64)
- Create custom “command handlers,” which cause the device to react upon reception of a “command”-style MQTT message. For example, you could send a command to blink an onboard LED or reboot the device.
I’ve committed a few micropython-watson-iot examples; you can use adapt these patterns to your own code.
There’s really a lot more going on here than just MQTT—dashboards and gateways and all sorts of hoodoo that I am not going to go into. But now it’s easy to use with MicroPython on an ESP32, thanks to ME.
Ahem…
Recap, Obligatory Link Dump, & Goodbyes
In this tutorial, we’ve learned:
- What MQTT is (and what it’s for)
- How to talk to an MQTT broker using MicroPython and an ESP32
- How to publish structured data
- Install MicroPython libraries from PyPi via
upip - How to subscribe to simple topics via a standalone MQTT client
- How to publish data to Watson IoT Platform via its Quickstart site, using micropython-watson-iot
Check out the README of micropython-watson-iot for more info on usage and discussion of its limitations.
I’ve posted the complete example files in this Gist for your convenience.
Thanks for reading! Extra thanks for doing, too.